Below are answers to some questions I’ve recently received which are representative of questions I often get about the Display Prep Demo and related topics.
Before I jump into the questions themselves, though, I’d like to address something that’s an implied/unstated premise in many questions I get. It relates to a concept I tried to make clear in the Display Prep Demo and to restate in the Followup presentation, but is still often missed or misunderstood. That concept is this:
That a data set on scanned film negative is not the same thing as a data set on traditionally contact-printed film.
Although it sounds so obvious as to be a tautology, it's worth stating unequivocally: in computational modeling, your data set should be about the system you’re modeling, not on some other system you’re not modeling.
You don’t have to be interested in a traditional contact printed look, but if you are (as many seem to be), then that's what your data set needs to be about. Not only are contact printed film and scanned camera negative two totally different imaging systems, but one of them is incomplete: scanned film is an uninterpreted source for creating any desired final look, not itself a final look.
I think we’re culturally conditioned to believe that if the word “film” describes anything at all at any point in a system, then a magical wand has been waved and everything throughout that system is now automatically and inherently “filmy” with no effort and no matter what we do. But scanned camera negative is uninterpreted data with no inherent look, just like original camera files from a digital camera. In the Followup I even showed that, because it has no inherent look, depending on the viewing transformation used, scanned film can easily be interpreted to have the out-of-the-box look of a digital camera.
Just as much (if not more) computational modeling is required to develop a transformation from scanned film source to contact-printed final look as to develop a transformation to get the same look from a digital camera source.
It’s shown in the Followup that the step that makes Alexa and scanned film look like each other does not make them look like printed film. They are matched to one another in a neutral space (in an “uninterpreted data” space, as I call it in the demo) and then the final viewing transformation that takes that neutral space to a print film look is a separate operation.
Neither the digital camera files nor the scanned film files starts out closer than the other to the final look of contact printed film! The scanned film data set used in the demo was a source, not a destination. There were three data sets used to create the transformations for the demo: scanned film, Alexa LogC, and traditional contact printed film. The first two were sources and only the third was a destination.
The scanned-film data played no part in devising the target look -- it was only even in there because it was one of the cameras that was used as a source in shooting the Demo. It was, instead, the data set on contact printed film that was used to create the target look -- that's info acquired with a densitometer measuring printed film, not with a scanner measuring original camera negative.
This is why I find it sort of comical when I’m sometimes asked a variation on the question: “why do you go through all this work to make digital look like film; why don’t you just shoot film.”
The dismissive use of the word "just" shows this question is only asked by those who have never had to do the color science themselves. It’s often a much bigger task to develop a workable scanned-negative-to-print-film transformation than a digital-source-to-print-film transformation. Those who don’t have to do the work themselves might imagine that any system that has a film step anywhere in it magically sorts itself out, but to make that presumption is not to appreciate the work of the scientists, engineers, and artists who develop the requisite transformations for a real-world workflow that is not made out of magic.
Okay, now on to answering the Q&A. Answers are in bold, questions are not.
———————————————————————
Regarding the limits of traditional color correction, how does the selection tool in Resolve compare to the 3D space controls you are using in Nuke? I feel that this tool can allow for the very specific modification of patches of colors within a range of hue, saturation, and value that to me seems like it is a sort of 3D selection.
Before I answer, let me clarify that I’m not just “using” but designing most of these 3D tools that I use in Nuke. They are not built-in operations, but operations I’m designing computationally from scratch, which also means they’re not unique to Nuke — they can be ported to any platform since they’re built from the ground up and don’t rely on any Nuke-specific black-box stuff.
So to answer the question:
Yes, of course the 3D selection tool in a color corrector allows specific modification of colors. But the way in which one tool does that differently from another is the very matter at hand.
There are effectively infinite combinations for what’s happening in the rest of the color volume when one point (or some subset of points) hits a desired target. This goes to the heart of a point I made in the Followup presentation when I said it’s not just having a data set, but also what you do with a data set that matters.
In the present case, the question is: if you have some number of data points (large or small) that you know you want to push from source to destination, what happens between and around the data points: what happens everywhere in the color volume where you don't have a source/target pair?
And that’s the very reason I use this custom thing I made that I call Cone Coordinates, so that the overall deformation of the cube (not just the targeted points) behaves the way I prefer for my desired look when the data point targets are hit.
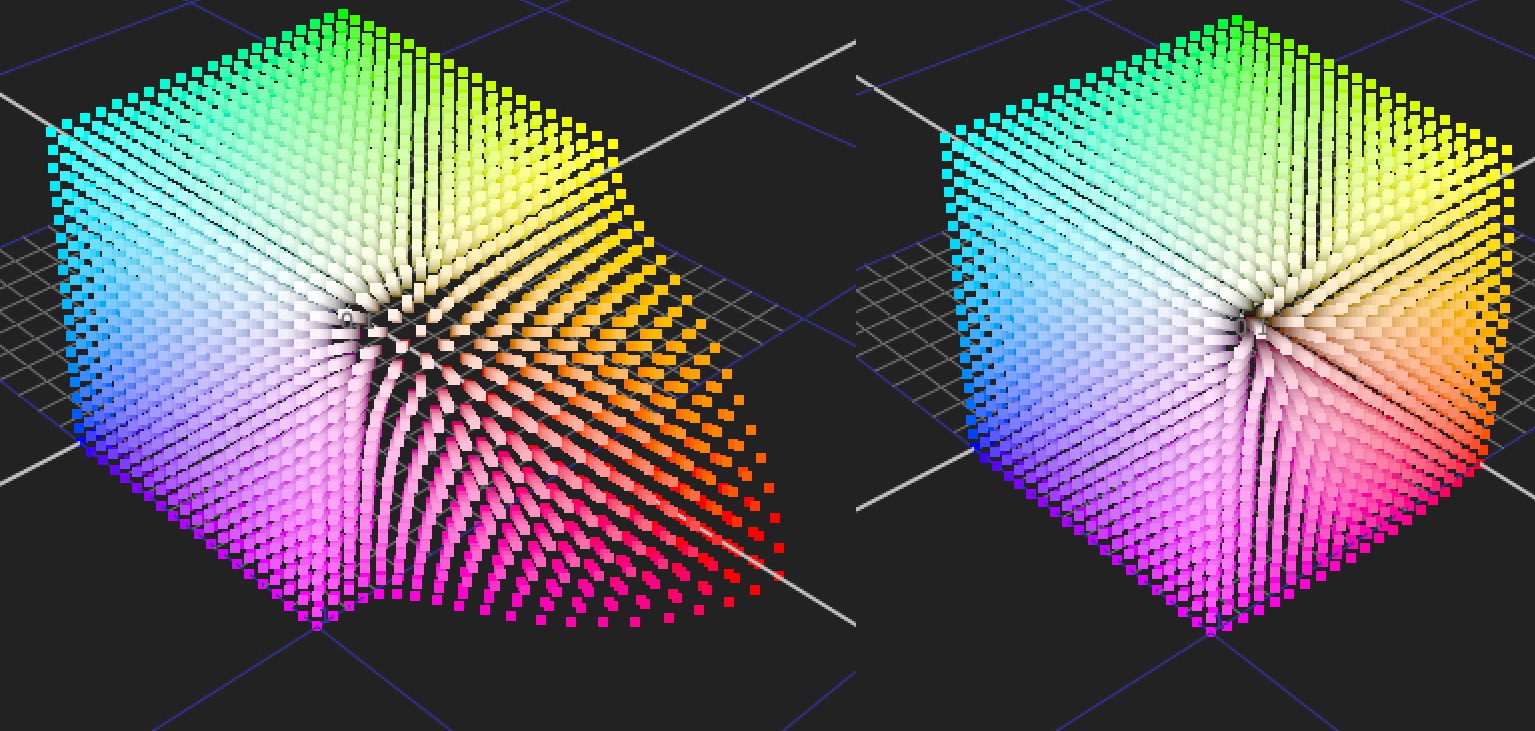
Pretty much all of the 3D tools in most color correctors (the Keyer, the Hue-vs-Hue tool, the Hue-vs-Satch tool, etc) use HSV keying, which gives a very different result than cone coords. Below are two graphed examples in which I have increased saturation in the red area of the cube the same amount in both, but using two different methods — in both cases using the red chip on a LogC Macbeth chart as the target. In other words: it’s a comparison of what happens in the REST of the color volume when the same thing happens at some specific position in it.
You can see that, using HSV math (specifically Hue-Versus-Satch in the color corrector), by the time that red chip on the Macbeth chart (which is not especially near the cube corner) hits its target and is saturated the desired amount, then other more saturated reds (like red LEDs or red neon signs) have been hit with a sledgehammer. But those colors have been treated more gently when the same source/target pair is hit using cone coords.
I actually already gave an example of this same thing in the Followup, when I compared overall (instead of red-targeted) saturation in HSV to the same in cone coords.
This illustrates how you can hit a target (or several targets) perfectly with various methods of “specific modification of colors,” and get very different results from the different methods. Just knowing that a transformation hits one target (or a finite set of targets) does not tell you anything about what that transformation is doing to all the other points in the color volume.
Regarding a comment you made about the difference between highlight handling between capture mediums (film and digital), you said that a curve can be created to model the highlight handling of one medium to another. What I am wondering is, at what point do differences between the capture mediums appear, and how this would effect on set exposure and workflow?
Firstly, I specifically said in the Followup that I don’t attribute “handling” to the camera format, but to the people and processes doing the actual handling in the downstream pipeline. So in the paradigm I’m advocating, there is no such thing as “difference between highlight handing between capture mediums." The camera merely captures the highlight or doesn't, it doesn't handle them.
But more to the point:
I don't believe that there's some edge case where my central premise falls apart. That premise is that the substantive as opposed to trivial difference between the capture media is how much information they get, not some other magical unnamed attribute that suddenly becomes visible in edge cases (I can't even imagine what attribute or what edge case that might be).
If, when comparing two formats, we never captured some crucial information in one format but did in the other (like, if we overexposed one format and didn’t get the highlights but properly exposed the other format, or if the overall latitude of one format is narrower than another), then of course there is a substantive and important difference (not a trivial unimportant difference) between the actual real data collected by the two formats.
But if they both got enough information for our desired look, then there is no substantive difference for what’s possible in sculpting that look. We can push the tone curve or color rendition to whatever shape we want in all cases. In your highlight example: if they both got the highlights, they both got them. There’s no other magically unnamed attribute that will suddenly “appear.”
To state the obvious: if the meter measured the thing it was measuring, then it measured it.
Or, to answer the question as it was worded: the “point [where] differences between the capture mediums appear” is precisely the point where the two capture media get different amounts of information. Full stop. There is no other point where it appears.
Which is my whole theme: there is not some strange edge case where two formats get the same information as each other, but we are magically barred from using that information as we please in one case but not the other.
Now, of course, the fact that it’s possible to remap data to any desired look does not mean that you or I or any one specific person knows how to do so. So, if we don’t know how to do it in one case and only know how to get our desired look using one format and not another, then we’ve indeed hit a limit, but it’s a limit in our personal knowledge, not in the format. Someone else might just as easily be in a reverse position and know how to get that same look only from the other format.
[Following up on the previous question]: a camera with photosites that fill up and have a clipping "cap" will capture a scene differently than a negative that will simply become more dense when exposed to greater amounts of light.
This is a false differentiation. Both film and digital "simply become more dense" and then both "have a... 'cap'" at the end of their range.
There are endpoints on both the high and low ends of their measuring ranges where they stop responding. That is one of the several things I mean by “did you get the information or not”; I mean was your scene data within the camera's measuring range?
The point where either system stops responding on the high end is the point where we put more light on it and the result doesn’t change. It’s like the needle in a volt meter hitting the end of the scale — it doesn’t mean there isn’t more voltage than the highest reading on the scale, it just means the measuring tool is maxed out. Film and digital behave precisely the same way as each other and as a volt meter in this regard. Film is not a magically infinite meter with no cap; like digital capture, it has a range of measurement that hits limits at the endpoints.
“Photochemical” (as opposed to “digital”) does not mean “magically infinite,” it’s just a different technology to do the exact same type of colorimetric measurement. In fact, there are long established terms for the the endpoints of films measuring range: "dMin" and "dMax."
So, both descriptions in the question apply equally to both formats and are not a differentiation. They both “get more dense” (i.e continue to respond with exposure) with greater amounts of light within their measurement range. And they both “cap out" at some point when we get to the endpoints of that range. Again with the volt meter analogy: both formats move the needle to the right (“get more dense”) as the light energy increases, but both needles stop moving when they hit the end of their range.
If some one format has a wider range than another, that would mean it gets more information, and we’re back to my original point which is that the only feature that substantially (as opposed to trivially) differentiates the formats is how much information they get. All formats have fixed ranges and all of the formats are made out of real world materials, not magic. One format may have more range than another, but the range is never infinite. And the actual finite width of the ranges varies across technologies such that film (as opposed to digital) has neither the widest nor narrowest range on the market.
In order to shoot a scene with high subject brightness range on both film and digital, do you ever feel the need to "remap" or "rerate" the sensor in order to adjust the shadow/highlight split on the Alexa? It would seem to me that in order to be able to have flexibility in adjusting the parameter of highlight handling, one would need to maximize highlight detail on the Alexa in the first place.
This is another false differentiation. Why pick out the Alexa as opposed to any or every other capture format to say that we should optimize ("maximize") our tools for your purposes? I’d say we should always optimize our tools for what we’re doing, and there is no evidence or logic to support the implied premise that we should only optimize when using the Alexa and do something unoptimized when using other brands.
This type of optimization is not specific to Alexa versus other cameras or film versus digital or anything else. It’s the same for all capture formats and how it works is this: there is a fixed range (as discussed above) and where we choose to expose within that range determines how much overexposure latitude we have, how much underexposure latitude we have, and how much noise we have.
Nothing we can do will expand the overall range; “rerating” means shifting where in the range we're putting our “middle” or “normal" exposure. We can’t magically make the sensor better (i.e. make it become a better instrument of measurement) than it was just a moment ago merely because we are now shooting a more challenging high contrast scene and find ourselves wishing for a better sensor.
This is why I say it's important to test cameras for how much real information they actually get rather than for the out-of-the-box look bundled by the manufacturer. I’m advocating selecting a technically suitable instrument for our purposes, because there is no magical incantation that will transmute it to a different machine just because we find ourselves in a tight spot, so better to have selected the most suitable apparatus before starting a project.
With all image sensors (as with film), as we expose closer to the top of the range (lowering the nominal Exposure Index or ISO), we reduce noise and we get more shadow latitude but give up highlight latitude. Conversely, the closer to the bottom we expose (increasing nominal ISO), we increase noise, reduce shadow latitude, and increase highlight latitude. It’s a tradeoff in deciding how to allocate what the sensor can do, not a way to magically transform the sensor into a better device than it actually is.
I suppose it'd be possible to rate the sensor in an unoptimized way for more forgiving low contrast scenes, and then only optimize our exposure when shooting more challenging scenes, but to be able to that requires an understanding of how to optimize it, so why pointedly un-optimize it in less challenging scenes just so we can do something different for the more challenging scene?
For example, I often use the Alexa (which I’m not endorsing over competitors; I’m just familiar with it) so I know through testing and experience that it has good highlight latitude and good shadow latitude and acceptable noise at 800 ISO. So, I just always shoot it at 800 (I know I can rerate if I want to, but there’s usually no reason to do so). I’ve tested some other cameras that don’t have a sweet spot like that: like, I’ve seen more than one camera model that demands to be rated at around 200 ISO for acceptable noise but at 800 or 1600 ISO for acceptable highlight latitude. Well, we can’t magically make that sensor different than it is when we find ourselves in a challenging situation — that particular camera just can't deliver everything we hope for: we can have our desired noise level or our desired highlight latitude, but not both.
That’s why I test and select cameras for technical attributes like their actual noise and latitude rather than for superficial things like their out-of-the-box look or for their manufacture-touted specs. That way I can head off problems like your high-contrast example and avoiding selecting an unsuited camera merely because of a cool off-the-shelf look or boastful advertising language.
In regards to RAW data, is the whole thing a sham? In order to have maximum capture data, is it simply about a very high data rate (low compression)? Are the "compressed RAW" codecs being used by companies like Red and Black Magic just a marketing gimmick, similar to how you showed in the resolution demo that 4k distribution is mostly a gimmick by TV companies?
RAW itself is not a sham, but some inflated superstitions about how it works are.
Remember, in the technical definition and not general English-language definition, RAW means “not yet converted from Bayer to RGB." And it really is that, but nothing more than that (though some other non-inherent attributes may be coupled with RAW due to real-life implementation restrictions).
What I explain in the Followup is that doing color transforms like applying gains, tone maps, and matrices does not yield any better result by doing them in Bayer rather than doing them in RGB (in fact, you CAN’T apply the matrices in Bayer).
So, I was showing that it’s a fallacy when some believe, for example, that they can get more actual information by increasing the nominal ISO (brightening) or by changing white balance if they do so in the Debayer software than they can by doing it downstream in the computation chain. The brightness (ISO) and white balance and tone map adjustments that manufacturers offer in Debayer software is a handy tool that they kindly offer for us to do at the same time as the Debayer geometry, so it's nice of them to put it there, but it’s not magically better quality color transformation for being done at that position in the computation stack.
RAW itself is real, not a sham, and has other advantages (just not the fake advantage that some believe it has of magically having more color data).
The main (real) advantage is that, since real-world sensors are Bayer, RAW is much more efficient -- meaning that Bayer is more efficient for storage and throughput than RGB. As you saw in the Followup, converting Bayer to RGB requires inventing 2 non-existent channel values at each pixel position. This means the file is being inflated to triple its size with artificial code values that are not real scene data.
So, to use RGB instead of Bayer transport files, the camera would first have to do the increased processing and throughput in real time to run the demosaic algorithm that invents those code values, and then it would need to write to the capture card at triple the speed. Throughput, processing, read/write speed, and storage are all valuable commodities, and there’s no reason to waste them, especially not with an unnecessary 300% inflation.
For example, why unnecessarily triple the write speed requirements when we already wish the max framerate of the camera would be higher than it currently is?
So, the main advantage of RAW is that it’s not unnecessarily inflated, not that it has magically more inforation than the same data converted to RGB. Folks sometimes act as though the scene hasn’t been shot yet and we can go back in time and somehow retrieve information from the original scene that was never actually captured by the camera if we use not-yet-debayered transport files. This is a mental construction that does not represent how RAW or any real-world thing works. RAW doesn’t have more information than RGB; it’s just a more efficient file type to transport sensor data.
There is another advantage that RAW transport files sometimes (but not always!) have over RGB transport files that’s purely conventional and not inherent: it’s that some cameras allow you to get fully uncompressed files out of the camera, but only if they’re RAW. In which case it’s not an advantage because it’s RAW per se (not yet converted to RGB), it’s just that, in these cases, to get the advantage that we're after (uncompressed), we also have to take along with it another attribute (RAW).
Present day cameras that fall under this description would include all of Arri’s Alexa family and most DSLR or mirrorless system cameras. Arri’s camera allows you to retrieve the fully uncompressed sensor data, but only if using a RAW (not-yet-debayered) transport file (ArriRaw). If we take an already-debayered file out of the camera, it’s also compressed (ProRes or DNxHD). RAW is a quality advantage in this case not because it's RAW, but because it's uncompressed.
Same with most still cameras: they will deliver RAW (not-yet-Debayered) files that are uncompressed or they’ll deliver already-debayered JPEG files, which are very compressed. So, again, the main advantage of RAW is that it’s uncompressed. The fact that it’s RAW per se (not-yet-converted-to-RGB) is not so much a quality advantage as just a dry technical requirement for getting uncompressed files out of the camera.
See: it's just a convention of some camera models that RAW and uncompressed go together. But those are two separate attributes.
And there are cameras where those two separate attributes do not go together, such as the Red family of cameras. Red cameras deliver .R3D files that are both RAW and compressed. So, in that case, RAW still means “not-yet-debayered,” but doesn't mean uncompressed, which is the attribute that’s actually a big deal for quality. Don’t get me wrong: R3D is pretty darn good compression, but it’s still compression. That’s less info than the original sensor got. There is simply no way to get uncompressed files out of those cameras, so in those cases, RAW does not have the quality advantage of being uncompressed, even though it is still truly RAW, meaning only not-yet-debayered.
Do you have any examples of the "uncharted territory," boundry pushing looks that are possible with the manipulation of 3D color values? I am wondering what interesting creative choices you think could be possible in the future when software developers allow us to push these boundaries.
I don’t know; don’t expect too much of me, I’m just one person. I’m working hard on creating tools that don’t exist off-the-shelf and then using those tools to create my own look. I don’t know what exciting other looks filmmakers are going to create down the road, but that’s why I’m trying to inspire image authors to start thinking this way, so I can get to see all the cool stuff I haven’t yet imagined.
You said cameras are measuring tools, specifically colorimeters, is that correct?
Yes — a camera or sensor is basically a colorimeter (or, actually millions of colorimeters) that take 24 or some other number of readings per second.
A colorimeter is a meter that measures the amount of light energy in the visible spectrum in three bands, which is exactly what each little cluster of photosites does — so an image sensor is basically an array of millions of colorimeters that each take 24 readings per second. Spectrometers and spectroradiometers are different: those measure the spectrum in many bands instead of just three (they break it down into dozens or hundreds).
You said that for the most part, color grading is a million ways to do same two different simple transformations for the most part—what are those simple transformations?
Almost all color grading knobs do 1D adjustments, not 3D adjustments, which is pretty restrictive if you're talking about nuanced look authorship rather than simple color balancing.
But even more restrictive than that, if it’s literally a knob (and not a more complex interface, like, the Custom Curves tool in Resolve) it’s usually (though not always) some combo of just addition, multiplication, and exponent. That’s it.
In fact, even the four knobs that are used most: lift, gamma, gain, offset only do three different things, because lift and gain are both multiply. Lift is multiply with the pivot at white, and gain is multiply with the pivot at black, so anything you can do with lift, you can do with gain and offset, since offset is addition/subtraction.
So, for example, in Resolve (and I’m not knocking Resolve as opposed to other color grading software — it’s just the one I’m familiar with, and this isn’t even a bad thing), you can add/subtract using the offset knob in the Primaries screen or the Offset knob in the Log screen or with the Printer Lights button or with the offset bars in the bars screen or even, if you’re color grading in Log using ArriRaw, then if you do exposure or color temp or tint in the Camera Raw page, that’s also add/subtract (because that page does multiplication in Linear, which is the same as add/subtract in Log). So that’s a lot of different ways to do literally the simplest operation there is: addition/subtraction.
I discuss this and show visual results in the Display Prep Demo Followup.
You said there's a sort of catch all look that camera vendors use that isn't very cinematic. I know it's more video-y, but is there a way to describe what that means in more layman's terms?
That already is the way to describe it in layman’s terms, as far as I know, since that's just a broad description with no technical details.
I could start describing some of the component characteristics that make it so, but that would be more detail, not more easily digestible. The group of attributes associated with the word “video” are all sort of clinical and punchy whereas the attributes associated with the word “cinema” are more artful and soft. Again, I can break some of it down if you want, but I don’t want to type all that out here since you seem to be looking for an overview, not for more fine grain detail. (But see below where I get into some of the individual attributes.)
Maybe have a look at the Demo Followup where I compare Arri’s out of the box look with mine and see if you have a better way to describe it.
I've found some "film emulation LUTS" that claim to use 3D math developed from scanned film stocks out there--my guess is they are much simpler than yours, but do you have any idea if they're similar to what you're doing (or would I have to ask them)? Is this the kind of thing you want to see more of, or not really?
I don’t know what those specific products are doing. They’re for sure indeed using 3D math, there’s no reason to doubt that — but that doesn’t tell you whether it’s good math or bad or whether it’s complicated or simple or what data sets it’s based on. The mere fact that math (even 3D math) has been used does not tell you what sort of math it is or whether or not it’s been used correctly or in an uninteresting way or in a way that’s applicable to your purposes.
I don't know what sorts of computational operations they use, or what data sets they’re basing it on. I don’t want to denigrate or assume anyone is doing anything wrong, but I’ve seen instances of folks who have something to sell paying lip service to “color science” without backing it up with the real work. I’m not saying that’s the case with this specific product. I just don’t know.
The reason I would be skeptical of something like this (again, not this one per se) is that (in my admittedly limited experience) the sale of standalone LUTs is often snakeoil. Many folks who actually know what they’re doing in a deep way don’t sell standalone LUTs on websites but work at a post facility whose business model is to be the full-on post vendor (or VFX vendor) for projects, in which case the overall fee would be much greater, but the creation of LUTs is not itself charged for and is just part of the larger partnership and collaboration.
It’s also worth noting that you said the data sets they used were of “scanned film stocks.” As described above, to my mind, that would preclude it being a rigorous emulation of a traditional photochemical contact printing system if they have no data sets on… well, on the thing they’re emulating. As you saw in the Followup, for the Display Prep Demo, the scanned film required just as much “emulation” to get a printed film look as the Alexa footage did, since scanned camera negative film does not enforce a contract printed look, and can only achieve sucha look if some has done the work to develop the transformation to make it do so. Unlike a projection print, scanned negative is a source, not a destination, so there's no reason to assume that a scanned neg data set is a "look" rather than still-uninterpreted data that can yield any look you want (or don't want).
You said that when people talk about the "film look," they're really describing a bunch of different factors. I know from reading all the stuff on your site that those factors include halation, [erosion at] high contrast edges, gate weave, color, density and a few others. A lot of your work is in figuring out what those are specifically are. [Can you give a breakdown of these attribtues, or since that might be too broad, can you discuss what you're doing in your model at least.]
Okay, there are two different ways to look at this:
1. In order for me to get what I personally feel is that look of printed film, I apply one algorithm to scanned film (a complex color transformation) or 4 algorithms to Alexa: grain, halation, gate weave, and a complex color transformation (a different but equivalent complex color transformation to the one I apply to scanned film). So, in this way of thinking about it, you could say there are only 4 attributes that characterize the difference between original image data from a digital camera and a traditional printed film look (at least to my own tase for the threshold of achieving interchangeability).
2. On other hand, even though there are only four algorithms, one of the 4 (the most important one!) is responsible for many different perceptual attributes. The "complex color transformation" is computationally compartmentalized as one algorithm in the stack, but it has many (not just one) perceptual results, some of which are often described in vague wine tasting terms. “Skin tones,” “highlight rolloff,” "visceral feel," “warmth” (meaning emotional warmth, not orange warmth), “artistic instead of clinical,” etc. That one step in the computation stack includes all the complexity of the tonal and color rendition!
If you JUST want to emulate a specific neg/print film system, then if you create a transformation that pushes all the colors and desnities of the source to the colors and densities of the target (which is not a trivial task but can be done), then you will have exhaustively gotten all those attributes without understanding them as individual componenents.
BUT if you want to author a look creatively rather than do a wholesale emulation, it might be nice to understand elements within that look as building blocks. For example: the exact shape of the tone curve that creates the highlight rolloff, or complex idiosyncrasies in color rendition that are technically incorrect color rendering that make it feel artful instead of clinical, or how it's a surprisingly important part of a cinematic look that film print systems have color crossover in their tone curves which is in no way colorimetrically correct, but looks pleasing. And on and on.
In this way of looking at it, there are many many more than four attributes, even though there are only four main steps in the computation stack. In fact: it’s literally, not just philosophically, true that the “color and density” step in the computation stack is a flattened version of its own complicated computation stack (or sub-stack).
If it's possible, could you do a walkthrough of modeling a characteristic you want? So if its film's halation, how do you identify that, then make the math, then put it into the LUT? Are you filming various patterns on film and measuring them in Photoshop, then somehow turning that into math that you put into some kind of other program that becomes the LUT?
I'm not sure why you mention Photoshop specifically. Nothing against it, but it's not as direct-access and customizable as something like Nuke, which, as you can tell from my followup is what I most often use for image analysis and manipulation. If you're interested in something else that's similar for these specific purposes, I'd point to Fusion more than Photoshop (or Shake, though Shake is pretty much obsolete now).
Have a look again at the Display Prep Demo Followup, I actually get into some of this.
But: you can’t put a halation algorithm into LUT, because it’s spatial. If you’ve read the “On Color Science” document, you’ll remember I talk about spatial, temporal, and intra-pixel attributes. LUTs can ONLY represent transformations/operations that are intra-pixel because they only operate on one pixel at a time. In other words, a LUT takes an input triplet of RGB values for one single pixel at a time and delivers an output RGB triplet without looking at surrounding pixels.
To do spatial operations (like blur, halation, sharpening, etc), you need to have an image buffer that can access more than one pixel at time. And to do temporal, operations, you need to be able to access pixels in different frames than the current frame being operated on.
So, for example: with intra-pixel, operations, I can do something incredibly complex with tons of custom complex math that has many sequential operations, but then I can flatten all of that into a standardized LUT format that does the sum total of them all together — I can give it to my post house and they can apply it as-is in many different software platforms. So even if I’m using crazy math that they don’t have implementations for, they can still apply the flattened transformation without custom implementation. They don’t have all the component operations, but they have the sum total of them in a standardized interchange format that does not require special implementation.
So: no matter how customized the operations are under the hood, the interchange format for communicating the concatenated result for intra-pixel transformations is standardized and not custom.
But that can’t be done with spatial and temporal operations. With spatial and temporal operations that are customized (not off-the-shelf) plugins, they usually need to be coded specifically for each platform. So, for example: I might code an algorithm in Blink, which is a C++ style language in Nuke for directly operating on image data. Then, I can hand that algorithm to my colleagues at my post house and they can (and do) do two things with it: 1. They can use the Blink script in Nuke to actually apply to imagery. 2. And they can port the code into their in-house software: just translate the code from Blink to the in-house software.
It’s important to note in that the latter is possible only because my algorithms are pure unambiguous math operations acting on the image data. If I had used some sort of black-box built in plugin inside of Nuke, it would not be portable. Because one of the steps in the algorithm would effectively be “and then apply some proprietary process from Nuke that we don’t know what it’s doing.” Obviously, “do something really specific, but I don’t know what it is” is not a command a computer can meaningfully execute — algorithms, by their very definition need to be completely unambiguous.
You said you had to build custom tools from scratch because existing off-the-shelf solutions were not suitable. You mention it on your site sort of but could you just break down what those tools are Are they programs? Plugins? Code you’re putting into other programs? I think people would want to know what the hands on part looks like for you.
As mentioned above: I always use unambiguous math to operate directly on image data… math that is built from scratch and does not rest on some pre-existing blackbox algorithm that I don’t know what it’s doing.
Implementations of this vary. They include:
-Blink script in Nuke.
-Fuse script in Fusion
-Pure expressions. That is, writing out pure math expressions for something that can interpret them, like an Expression node in Nuke or any type of stand-alone rendering that can interpret math expressions. For example: Expression nodes in Nuke can accept TCL or Python style expressions or Custom nodes in Fusion can accept C-like expressions, but it’s JUST math expressions and not line-by-line interpretation of code like Blink is. So, it can’t do operations that includes flow control (such as "if/then" or “while” or “for/next”).
-Stand alone Python scripts (or scripts in other langauges). For example, I have written a Python script that run in a command line environment and you feed it a big (or small) data set and give it some parameters and it does scattered data interpolation on the data set and delivers a 3D LUT.
-Porting to other software. If I write an unambiguous algorithm in anything at all (Python, Blink, Fuse, or even pseudocode) I can give it to the in-house developer at my post house and he can translate it to whatever else is needed. We’ve actually done exactly this where he re-writes an algorithm to be DaVinci Resolve Plugin, or an OFX Plugin or a Mystika plugin, etc.
I make all lots of little tools this way that stand alone or work together. If you look at the Followup again, you can see some examples, such as the "Tetra" tool I created, or the "Cone Coordinates" operators that I show. Those are just a couple examples, and those two happen to be coded in Blink script.
Another example is I have a suite of "LUT Tool" that I've coded in Python in Nuke, which doesn't do any actual image manipulation, but just automates tedious tasks that are necessary for data-modeling, such as extracting the 1D tone curve from a 3D transformation or extracting any number (even thousands or tens of thousands) of data points from image files and dumping them coherently into a text file.
Is there any resource you could point people to who want to do what you're doing? You mentioned the idea of working with high contrast edges to keep the film breakdown but maybe making it white instead of reddish. Let's say I want to try that, and am willing to go as far as it takes, but I have no idea where to start. Could someone figure out the math for themselves? Is there somewhere they can read up on it? What programs would I use?
I get asked this a lot, and unfortunately I don’t know where they would start if they’re not already deep into it other than to partner with someone who is. Take a look at the Demo Followup: I talk about developer versus user. The fact that you don’t know how to completely be a developer all by yourself doesn’t mean you can’t get involved in development stage in a collaborative way. The difference between author and shopper is not the same as the difference between developer and user and it’s not all or nothing.
For anyone who really wants to learn at the image-code-value and programming level, all I can recommend is just start tinkering and asking questions and doing trial-and-error and really checking and double-checking your work. There's no step-by-step process that I know of for learning.
I personally just get intersted in some one little aspect and go, "ooh, how does this work" and start playing. For example: I'd stayed away from Blink for a while because it seemed too time-consuming to learn, but then I was trying to achieve a specific task that I couldn't think of another way to do, so I just stumbled my way through it the first time at a painfully slow pace. Then, once I got familiar, it became a confortable go-to, even preferable, method.
Or another example: if I want to understand literally how rec1886 code values are decoded into light on the screen, I don't merely, say, look at a built-in rec1886 transformation in Nuke or Resolve. Instead, I download the actual ITU.R BT1886 document and study the chromaticity coordinates of the primaries and of the white point, and I look at the transfer function for encoding. That way I both understand what's actually happening and can either verify that a built-in rec1886 transformation in some software is correct or build my own.
I’m assuming “no,” but would modeling at the level of your film emulation LUT work on DSLRs, or do you need a high end cinema camera?
As I say in the demo, you need enough data for the look you're after. The exact look that I personally like for my own cinema projects would be slightly hampered in most DSLRs if shooting RAW stills and more than a bit hampered if shooting JPEGs or the type of highly compressed motion files that most of them use.
I’ll break some of this down below, but the bigger picture to keep in mind is that the overarching concepts of the demo are as true for DSLRs as they are for high end cinema cameras: the camera doesn’t make the look, processing does. If you accept a “look” from the camera menus, you’re just using off-the shelf handling of your image data instead of designing that image handling.
Even if the cameras are limited (as mentioned) from making some certain looks, you still have to make SOME look with the data available. And again, you can either accept the off-the shelf options and say silly things like “this camera gets beautiful colors and that one doesn’t” or you can take control and author the look.
So, when I shoot something with a DSLR (usually just snapshots), I do use all my color science tools to sculpt the look, but I have to work within the limits of what the camera can do. Here are some limitations:
-Most still cameras (in fact all that I’ve ever tested) don’t have as good latitude/noise as high end cinema cameras such as the Alexa. Latitude and noise are tied together. Here’s why: many of these cameras may nominally get the same latitude as the Alexa (like, they may respond to 14-stops between bottoming out on one end and maxing out on the other) BUT they’re so noisy that you can’t expose in the middle of that latitude unless you want a noisy image (with very electronic looking noise, not pleasing film-grain-looking noise. So you have to expose so that normally exposed objects in the scene are only, say, 3 stops down from blown out. So if you expose this way, you can’t hold highlights.
See how noise and latitude are related: you can expose in the middle of the range and hold highlights OR you can have low/acceptable noise, but not both. So, if you want to avoid noise, most DSLR-type cameras will clip highlights faster. So, you have to create a look that embraces that, which would be different than the look I usually go for in cinema, but could still be similar to a traditional filmy style if you want. For example, old school slide film stocks don’t hold highlights well either, so you could design a more slide-film-inspired transformation for your DSLR image data.
-If you shoot motion instead of stills, most DSLRs have a rolling shutter with a chase that’s noticeably slow (“chase” is the read-out/reset time). People call this “rolling shutter,” but high end cameras like Alexa, DXL, and even film all have rolling shutters too. That “Jell-O” effect as it’s also often called is not merely from the fact that it’s a rolling shutter but that it’s rolling shutter with an unacceptably slow chase instead of a tight chase. This is very perceptually noticeable and effects the audience’s experience of the “look.” And nothing can be properly done to mitigate it in post because it is truly a lack of information: you simply don’t have the information about what was going on in the upper left corner of the screen at a time close enough to what’s going on in the lower right. That’s information that was never captured, so it’s not a matter of sculpting a look or remapping data in post — you can’t remap data that you never got.
-The above two issues are true of many of these cameras even if you shoot RAW. The reason that RAW is important is NOT that’ it’s RAW per se (I explain this in both in the Followup and elsewhere in this document). It’s that RAW is the only way to get an uncompressed image out of most of those cameras. If you use a DSLR to shoot JPEG or motion images (which are usually some flavor of H264 or H265), it’s highly compressed. The important thing about RAW for quality is not that it’s RAW per-se but that it’s uncompressed. So, if you shoot highly compressed instead of RAW (as you must do when shooting motion on pretty much all of these DSLR-like cameras) then there are even more problems than the ones mentioned above. You can have all kinds of macroblocking artifacts that are detrimental to the look (at least to my taste) and/or you can lose color subtlety (shades of colors) that may not be immediately noticeable on a quick review of the image but that limit how much you can sculpt the look in the pipeline.
-But again: whatever information you got at the moment of recording is the only information you actually have (you can’t go back in time for a do-over). So, whether you sculpt the look yourself or accept an off-the-shelf solution, you’re limited by the available data. Either way: you have to find an acceptable look within the confines of the information that’s actually there.
In theory, could I not output a raw image with any given gamma transfer function into a 16-bit EXR and then linearize it in a compositing application?
Not just in theory, but in reality. This operation is done all the time in VFX and in color grading and sometimes even in the interchange of files (for example, when shots are pulled by the post house to be turned over to VFX vendors).
In my current understanding, this would maintain the intent of the DP all the way through the image pipeline to the grade while remaining completely non-destructive.
This is smearing two totally different concepts together. “Maintaining intent” and “remaining… non destructive” are two different things. If you watched the Display Prep Demo Followup, you saw the part where I baked in the LUT and compressed to ProRes, then round-tripped that back to LogC and through the forward LUT again. It had the exact same “look” as the normal version that wasn’t round tripped and compressed, so it clearly "maintained intent," but it also had rounding errors and did not remain non-destructive.
So, it’s clearly possible to “maintain intent” while being destructive. Another (trivial but very clear) example of maintaining intent while being destructive would be to take a finished color graded uncompressed master and, without messing up the color grade, compressing it to H264 for the web. Another simple example is merely resizing a finished, color-graded master from 4k to 2k: rendering intent is maintained in a transformation that cannot be described as non-destructive.
In no case is “maintaining the DPs intent” substantially or primarily achieved either through bit-depth or through a conventional colorspace transfer function (such as linear-to-LogC or 2.4-gamma-to-2.6-gamma, as opposed to an aesthetic transfer function such as part of a show-specific LUT).
So, you see that overall intent might be maintained even when a destructive operation is applied. But if "remaining non-destructive" and "maintaining the DPs" intent are not tethered, it must be possible to go the other way and retain quality while not transmitting the DPs intent. And this is of course possible too, as you can see through a thought experiment to see:
Let’s say there are two projects shot by two different DPs, both on Alexa using LogC Arri Wide Gamut RGB, but using two very different show LUTs and color grading styles. Now, let’s say both shows use a similar pipeline to one another wherein the transport files from set to archive are 12-bit LogC AWG-RGB. After photography and archiving, the files are converted to 16-bit Linear Light for delivery to VFX, then the files are roundtripped from linear to Log and back for a subset of steps within the VFX computation stack and then rendered to 16-bit linear. Then those files are converted to LogC again for color grading. This actually a very realistic, common pipeline, not a wild hypothetical!
The result in this example is that sufficient bit depth and proper transfer function management after three successive lin/log roundtrips have quite literally got us exactly back where we started with the original generic LogC, but with no show-specific look -- no “DP's intent.”
If all you do is the operations enumerated above and nothing else, you've achieve a long series of operations that have remained non-destructive but failed transmit the DPs intent at all, let alone faithfully. Because all you've done with those operations on their own is proper management that has preserved the original uninterpreted camera data, not transmitted the intent of how to interpret it for display (Display Prep!). One show is going to handle that uninterpreted data very different than the other. So, the intent would need to be transmitted using some method not included in the above description of the bit depth and colorspace: usually, that could be something like a combination of CDLs and a show LUT.
So, even though you’re absolutely right that any non-destructive transfer function can be unambiguously and perfectly inverted, that just means it can get back to where it started: backwards to the source, not forward to the destination. Again, transmitting intent and not being destructive to uninterpreted camera original are both important, but are not the same thing (though they could overlap in extreme cases).
It's my understanding that even in workflows utilizing raw capture data, log DPXs are often still preferred. What advantage, if any, does a log workflow provide when working with raw and/or high-bit depth data?
The question of using transport files with linear density characteristics versus files with logarithmic density characteristics is completely unrelated to "raw" (see the section on "raw" elsewhere in this document) and is substantially unrelated to high versus low bit depth. Instead, the decision factors in this area are largely issues of logistics and efficiency, not quality, since quality between log and linear images can be interchangeable in a properly designed workflow. Log is always more perceptually efficient than linear. It doesn’t matter whether the bit depth is high or low, it's just always more practically efficient per bit. There is a nuance that has to do with the difference between integer-type computer files and floating point computer files, which I'll come back to later. Let's look at the simplest mental model first and imagine that all computer files are integer-type:
To see why log encoding makes more efficient use of quantization allocation (bit depth), we need to keep a few principles in mind at the same time:
1. Bit depth tells us the number of steps available (quantization) from min to max. "10 bit" means there 2-to-the-10th-power (2^10) steps, which is 1024. Or "16-bit" means there are 2^16 or 65,536 steps from min (zero) to max (100%). So "bit depth" or "quantization" is intensive not extensive. Larger bit depth does not mean the sensor sees a wider range; it means we're subdividing the range (whatever it happens to be!) into finer increments -- or recording more precisely our measurement within the range.
To make an analogy: a 1-meter-long measuring stick marked in millimeters can read more precisely, but not with a wider range, than a 1-meter-long measuring stick marked only in centimeters. Bit depth tells us how many increments there are within the measuring range, not how wide the measuring range is.
2. When we say that a camera transport file is encoded in "linear," we mean that the relationship between light intensity in the scene and the code-values in the file is linear (like, if light intensity doubles, then the code values in the file double). "Logarithmic" encoding means the relationship between light intensity in the scene and code-value is logarithmic.
3. Sensors are inherently linear because they take a direct measurement of light intensity in the scene.
4. Sensors are analog, not digital (they are basically volt meters, taking measurements of light entergy) and it's the analog-to-digital converter in the camera, not the sensor, that converts the measurement to digital code values.
5. Humans experience light logarithmically, not linearly, which is why we use f/stops and not some fixed amount of light as unit of increment. (Remember: an "f/stop" or "stop" of light is not a fixed amount of light, but a doubling of light).
So, in other words: the perceptual importance of illumination aligns more closely with doubling or halving than it does with adding or subtracting a fixed amount. This is obvious when you think, for example, that if you're in a dark room with a single candle and add a second candle, that's a large increase in the overall human perception of scene luminance. But adding that one candle in daylight has no perceptual effect for a human on the scene illumination even though, to a light meter, it still adds the same absolute amount of illumination.
So, with these five concepts in mind, let's think about a contemporary sensor in a high end cinema camera that gets somewhere around 14 stops of range. If we expose in the middle of the range, (meaning we expose a "middle gray" object so that it comes out in the middle of the 14 stop range), then we know that the vast majority of the content in most shots in our movie will be in that zone about 7 to 8 stops under where the sensor maxes out. That's because most cinematic scenes have the majority of the frame made out of imagery that is at or just under middle gray, and we've chosen to put middle gray 7 stops below sensor max, so we can have 7 stops of highlight latitude and 7 stops of shadow latitude.
We have a real-world analog sensor that has a finite precision of measurement: not just a limit to the width of the range (14-stops in the example), but also a limit to the precision within that range. These are analog limits, not digital limits, but real-world limits nonetheless. In a high end contemporary cinema camera, we know that the precision, though limited, is sufficient and good not just near the top but even at that crucial segment of the range that's 7 or 8 stops under max. And that it continues to respond (even if less accurately) all the way down to 14 stops under the max (that's what 14-stop range means: it can measure down to 14 stops under wherever it clips out).
Now, we wish to capture the sweet spot ("middle gray") with a precision that is non-destructive or at least very close to non-destructive to the orignal limits of the analog data -- we want to subdivide that interval into fine enough increments not to lose data. Because this sweet spot is around 7 stops under the sensor's max and a stop is a doubling and the sensor is linear, then no matter how many increments (quantization steps) we settle on as being "enough" at this sweet spot, the interval from 6 stops over to 7 stops over is going to be made out of 2^7 times as many (or 128 times as many) steps.
But this is nothing but a waste of data storage and throughput, since it's clearly false precision (recording the measurement with a precision that was never achieved). And even if it weren't false precision, it's still a total waste, since we clearly don't need the stop that's closest to blown out to be stored with 128-times more precision than the most important part of the image (which is near and just below middle gray).
This is the crux and it's inescapable: if the lower stops are are going to be sampled by the a-to-d converter into enough quantization steps as not to be destructive, then the higher stops are all going to be inflated with exponential waste. Thus, what makes the most sense for read/write efficiency and storage efficiency is to create an a-to-d converter of high precision to make sure it gets even the lower stops with enough precision, but then to logarithmically reallocate the quantization steps (so that we are not recording 128-times or more data of false precision), and then to downsample and write that reallocated data into a smaller file. For example: to do a 14 or 16-bit linear a-to-d conversion, logarithmically re-allocate, and then down-sample to 10-bit.
Below is a chart that shows how this works for a sensor that gets a little bit more than 14-stops of latitude, an a-to-d converter that samples at 14-bit, and an on-board processor that converts the linear data to log before downsampling to 10-bit. We can see that 10-bit log transport file is not merely passable, but is actually as much quality as we could ever hope for. That's becuase it is actually oversampled from black all the way to 1 stop overexposed; and from 1-stop over to full white, it gets more quantization steps per stop than it got even for the most important segment of the range that's around middle gray (i.e. if 71 steps is enough for the most important f/stop, then 76 steps must be enough for less important f/stops).
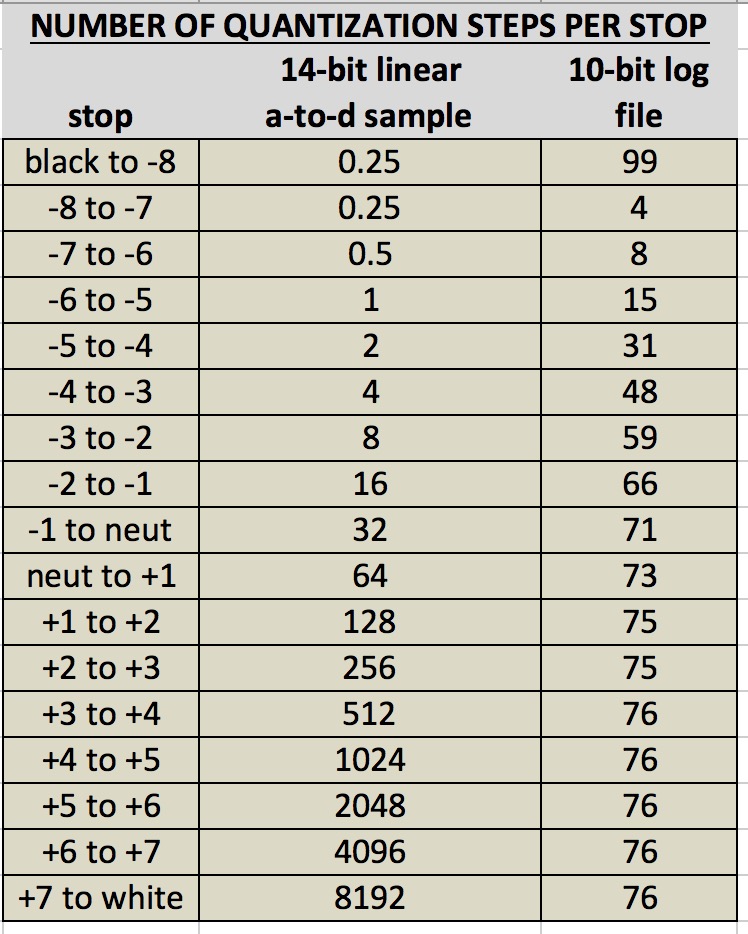
We can see here that a 10-bit logarithmic file can transport the full quality of the linear a-to-d data, whereas if we were to leave the data linear, then the transport file would have to be just as large as the orignal a-to-d sample at 14-bits not to be destructive. So, log can save us substantially on throughput and storage without costing any quality.
Now all of the above has been assuming that transport files use integer-type (as opposed to floating point) computer files. In reality both types of file exist, but also in reality, floating point is usually only used in post-production and never (or almost never) used onboard inside of a camera, which means that the existence of float type files does not change any of the above discussion in practical application. But let's talk about floating-point-type files now anyway.
Floating point files have a logarithmic reallocation actually built in to them natively. Meaning the available quantization steps are weighted towards the bottom so that small numbers are stored with high precision than large numbers, much like scientific notation.
That's sometimes but not always a benefit for post production files, because the file itself creates some of the benefits of log given above, even when the density characteristics of the stored RGB code values are linear. But there are several very good reasons why floating point files are usually never used onboard cameras and for initial transport from set to post and also some very good reasons why they are sometimes not used in various stages of post.
Keeping in mind that integer files storing logarithmic code values and floating point files storing linear code values are two ways to gain some advantages of logarithmic reallocation, here are some reasons why that the former rather than the latter are virtually always used as original camera files:
First, floating point does not use a logarithmic curve that's especially (as opposed to vaguely) optimized for imaging. Reallocating the quantization in a custom rather than generic way allows for targeted optimization.
Second, some of the reallocation benefit of floating point is offset by reallocation waste that does not occur in integer files. This is because there are many unused values including negative numbers, numbers above the sensor's maximum reading, and not-a-number values (binary words that floating point reserves for division by zero and infinites and so forth). In fact, just the positive/negative sign, which is useless for camera orignal files (though can sometimes be useful in post), takes up one entire bit -- not one quantization step of which there are many thousands or tens of thousands, but one whole bit of which there are only 16 or so!
Third, and perhaps most importantly, in order to actually get the efficiency advantage of logarithmic quantization reallocation, the logarithmic transport file needs to be several bits smaller (maybe about 2 to 6 bits smaller) than the original a-to-d linear sample, but in real-world application today, the existing floating point file types (usually OpenEXR, which are usually 16-bit) are actually larger than the real-world a-to-d converters' sample sizes in cameras, which are usually around 14 bits. So, given that the very benefit of log is that it's more efficient, that benefit cannot harnessed if the files are actually larger.
These are reasons we don't usually use floating point files onboard cameras or as initial transport files. They are also some counterarguments for using floating point files in post (like, for transport between VFX and final color grading). However, in this post environment, there are also some additional items on both sides of the scale:
One argument for floating point files (again, usually OpenEXR) for post interchange is that they allow for values above sensor-maximum. This means that computer generated elements can contain information that should be blown out in the shot. For example: something blazingly bright in a CG element will come into the color grade being (correctly!) shown as completely clipped out white, but if the colorist starts bringing it down, there's actually information in there. This argument does not hold for movies that have very few CG elements (even if they do have lots of non-CG VFX work!), since, by defintion, a real-world camera sensor does not capture anything above its own maximum.
Another argument for using OpenEXR as an exchange format is that it allows for native zip compression. This type of compression is binary compression, not image compression, so it works in a way that makes the storage size of the file smaller but without any of the quality loss associate with image compression (it literally restores itself back to the orignal uncompressed).
This means that a true 16-bit (de facto uncompressed) file can take up less space on a server or less time on a download than a 10-bit uncompressed file. However, this benefit is somewhat offset by the fact that decompressing the zip compression is processor intensive. Which can be very real problem, for example, if a color corrector wants to play back files in real time and is already struggling with all the other real-time processing already demanded of it.
Another argument against floating point files for post interchange is that there can be extra trickiness in handling them correctly. One of the biggest is that 3D LUTs, which are the universal standard for interchanging color transformations, require inputs that are on a scale of zero to one. This means that floating point files need some other non-3D-LUT transformation ahead of the 3D LUT. This can be tricky at best and sometimes impossible, depending on the type and age of software being used.
So to sum up and look again at your original question:
Asking whether log is "necessary" implies that there's some inherent/unstated reason to dislike log and that we're perpetually thinking of it as a necessary evil that we hope to dispense with. But the reality is that log is awesome, so whether or not it's "necessary," it's a great thing and often a better way to do things. Sometimes, the better way isn't "necessary," it's just better.
We also see that the benefits of log are not directly related to high bit depth versus low bit depth per se, because log is always more efficient per-bit than linear. I guess you're implying you yearn for a day when everything is so unnecessarily inflated that efficiency won't matter. But why is inefficiency of data storage a goal to strive for; what's the advantage? Especially when data centers are already overflowing and contributing to climate change with power consumption and air conditioning? (Click here for just one of many articles on data centers contribution to climate change.)
Plus, even on a project level rather than a global level, we are not at a point in history where increases in storage, throughput, and processing power don't have associated costs. So why increase costs and slow down work at every single step in the process for no imaging benefit?
So, yes, DPX is often "still preferred" because 10-bit DPX log (integer file type) is the same quality as 16-bit linear floating point, and in a smaller file that is less processor intensive and easier to handle (as in avoiding the 3D LUT problem mentioned above). Although DPX does not have native/internal zip compression like OpenEXR does, it can be zipped for archiving, so for long term storage (as opposed to quick access storage), it's still smaller, since zipped 10-bit is of course smaller than zipped 16-bit of the same content.